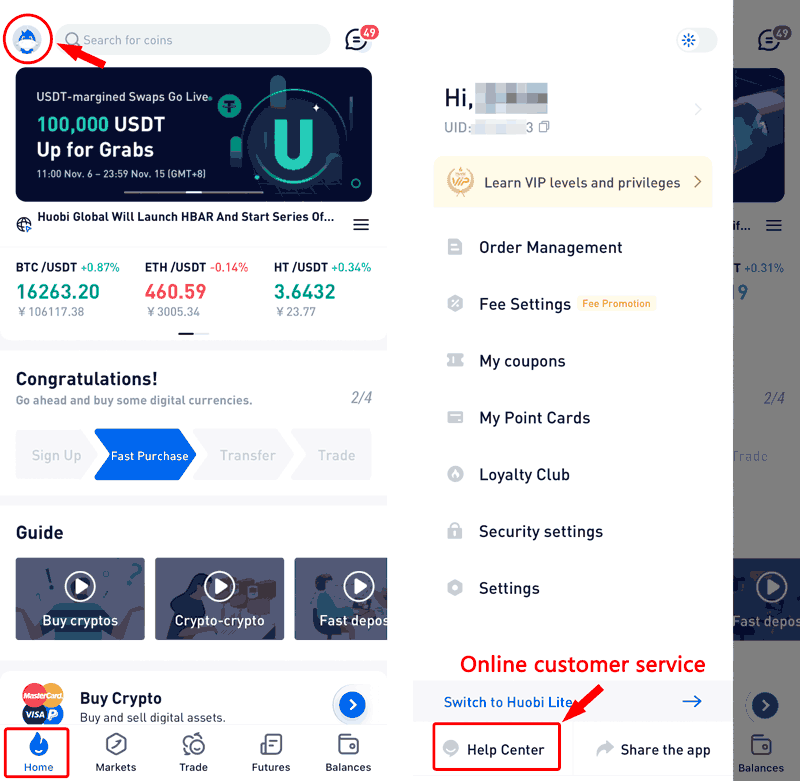
1. Logging into Huobi APP, users can find Futures (entrance) at the bottom of the home page. Users can click the avatar in the upper left corner of "Home" to view account UID, account center, settings and other information and enter the contact customer service channel (Huobi APP download address>>)
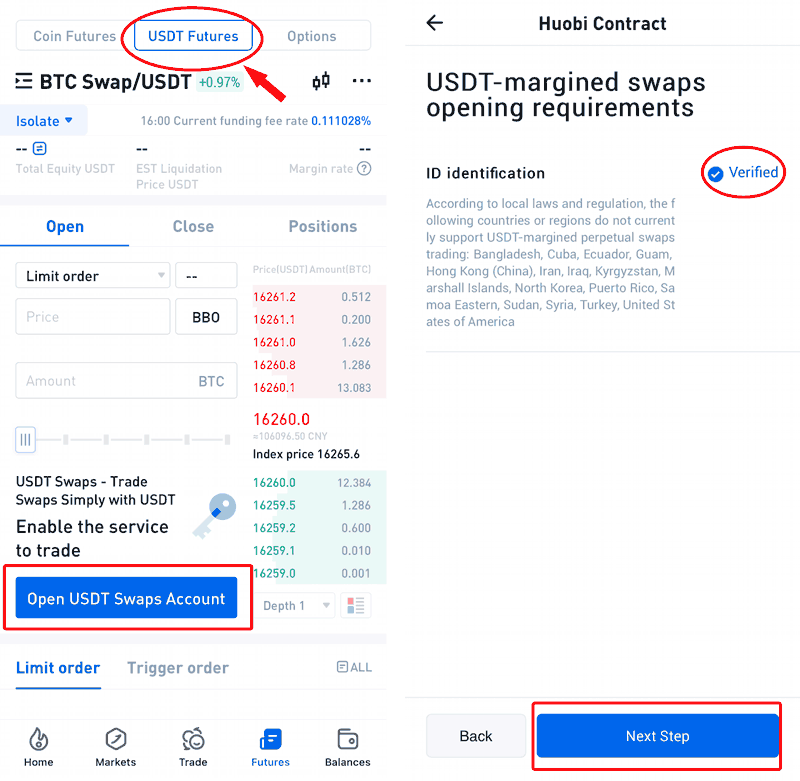
2. Click "Futures" in the bottom navigation bar to enter the futures transaction, click [USDT Futures] at the top of the page.If you have not opened a swap transaction,please click the “Open USDT Swaps Account” button to open the trading permission.
Click " Open USDT Swaps Account " on the prompt page. On the futures activation page, identity authentication must be performed before the identity authentication is completed. After the identity authentication is completed, the user service agreement page is entered. After agreeing to the agreement, click "Next Step" to successfully open the swap transaction.
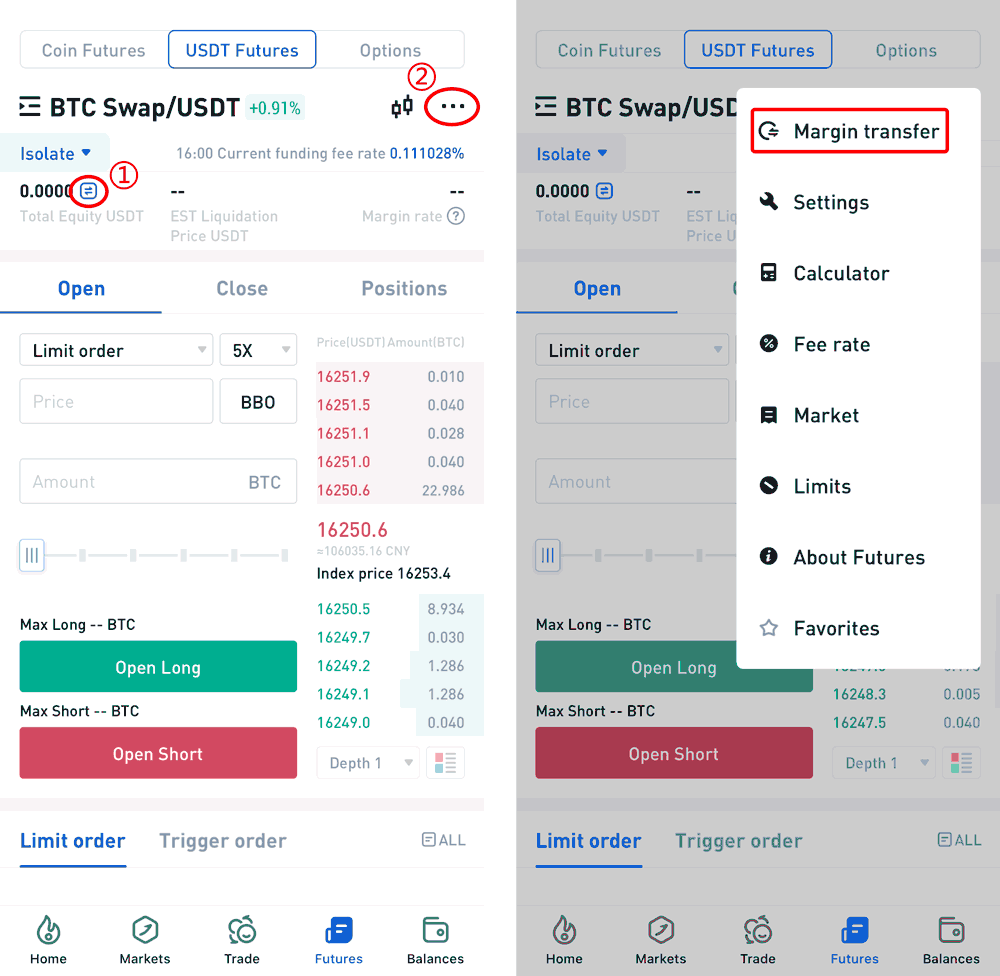
3. After opening USDT-Margin Swap, select the type of swap that needs to be traded and perform margin transfer.
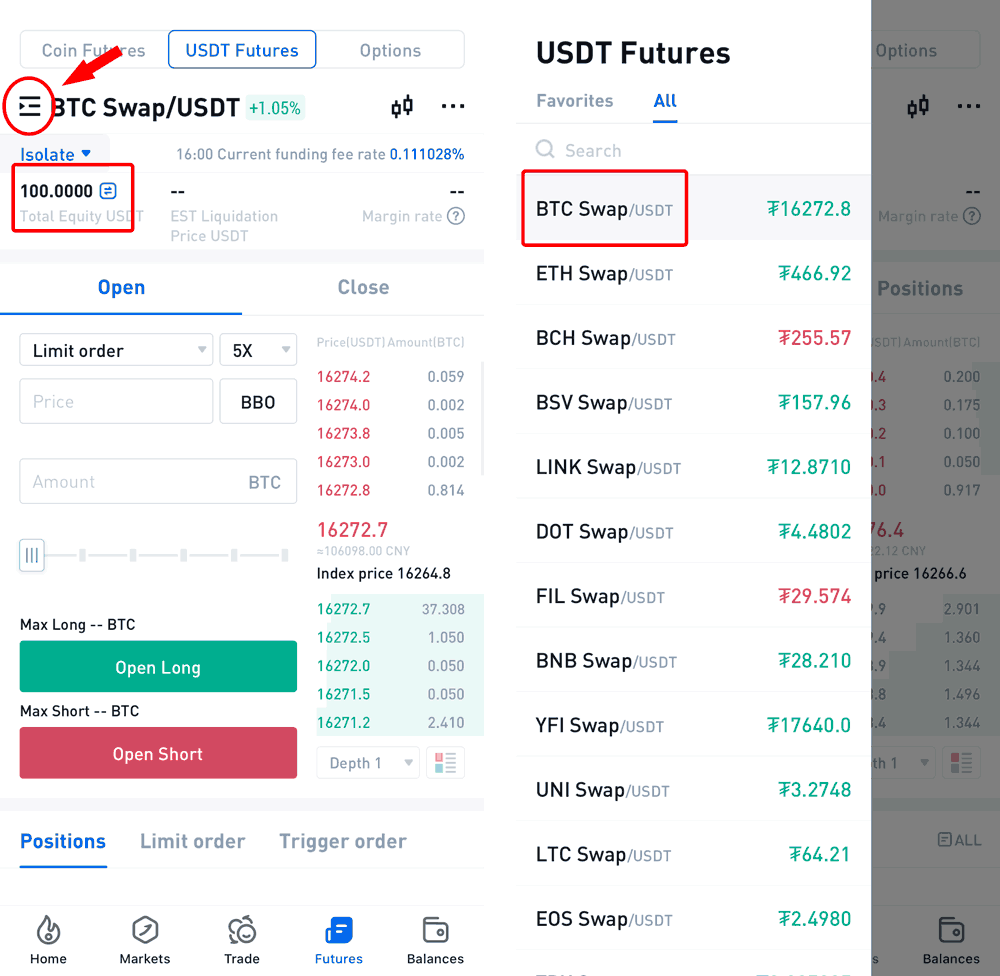
① Click the small transfer icon on the right side of "Total Equity USDT" on the trading interface to enter the transfer page;
②Click "···" in the upper right corner of the interface, and click "margin transfer" in the list window to enter the swipe page.
USDT-Margin Swap supports transfers from currency accounts, and supports each type of type. USDT-Margin Swap supports various currency swap to use USDT to supplement collateral assets. Users only need to transfer USDT to conduct transactions. Transfer between accounts.
- Transfer from exchange account to USDT-margined swaps isolated margin account
If you want to trade BTC/USDT swaps in isolated margin mode, you have to transfer USDT from [exchange account] to [USDT Swaps Account-BTC/USDT] first.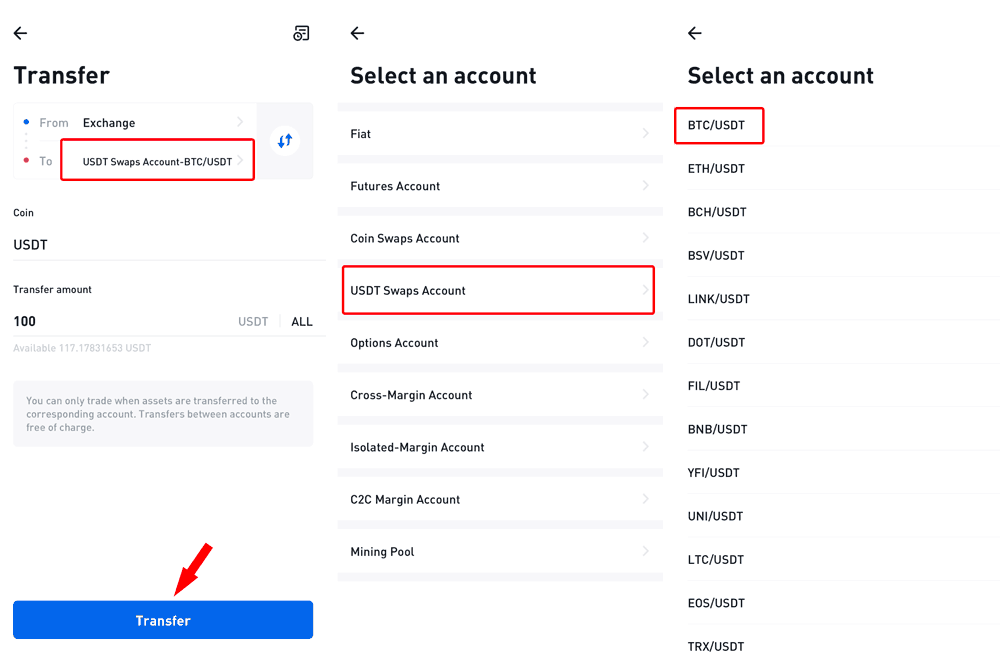
- Transfer from exchange account to USDT-margined swaps cross margin account
If you want to trade BTC/USDT swaps in cross margin mode, you have to transfer USDT from [exchange account] to [USDT Swaps Account- USDT Cross] first.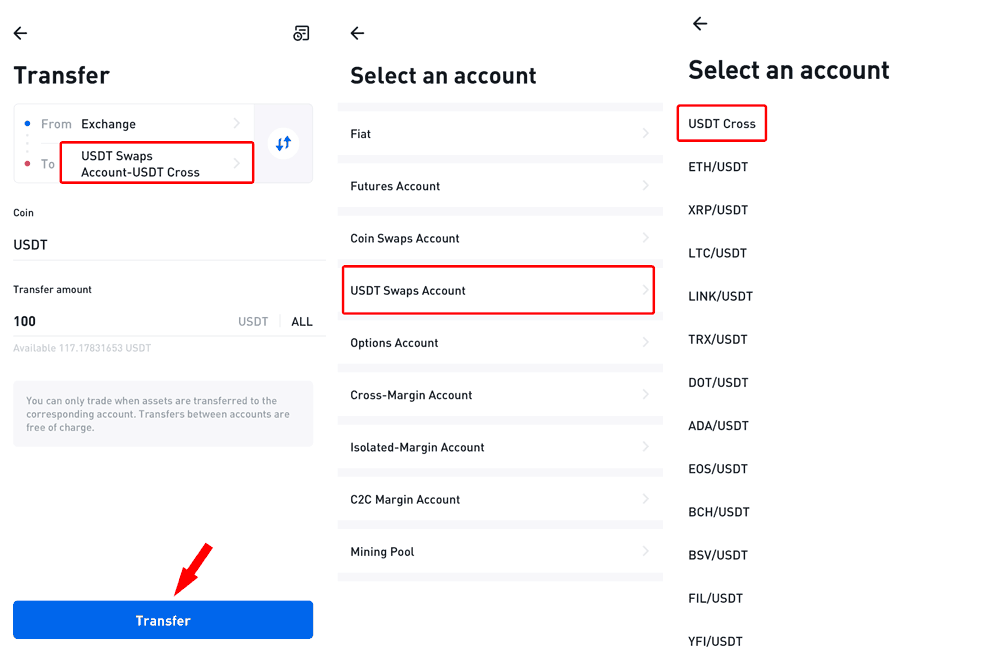
- The mutual transfer of various accounts of USDT-margined swaps:
If you have traded BTC/USDT swaps in isolated margin mode before and want to transfer the remaining assets in isolated margin account to your ETH/USDT isolated margin account. You can click to transfer the remaining assets from [USDT-margined swaps account- BTC/USDT] to [USDT-margined swaps account- ETH/USDT] as the picture below. If you need to transfer the remaining assets of BTC/USDT isolated margin account to cross margin account, you could click to transfer the assets from [USDT swaps account-BTC/USDT] to [USDT Swaps Account- USDT Cross]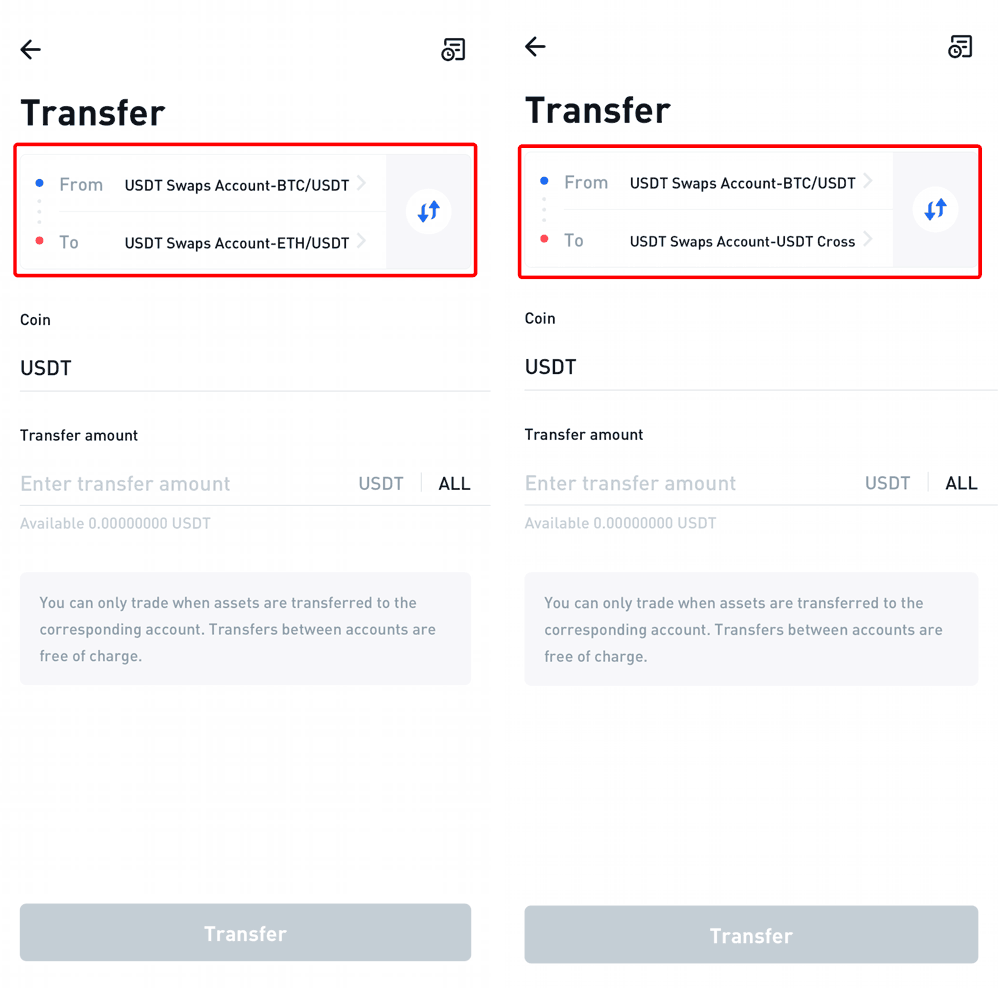
Note:
- Isolated margin mode: the account equity for each swaps is calculated separately, and the occupied margin, PnL and margin ratio of each swaps will not affect each other.
- Cross margin mode: all swaps under the cross margin mode share the USDT in the cross margin account as the margin, which indicates that all positions under the cross margin mode share the same account equity, and their PnL, occupied margin and margin ratio are calculated jointly.
4. Under the cross margin mode, all USDT-margined swaps that support cross margin mode share the USDT in the cross margin account. Cross and isolated margin mode can be used at the same time, and switch to another mode will not affect the current positions.

5. After the transfer is completed, you can see the total equity USDT in the upper left corner. Then click the list button in the upper left corner to select various types of swaps, and select different types of swaps to trade according to your needs, such as "BTC Swap".
6. USDT-Marin Swap currently support a maximum of 125 times leverage. If users use more than 20 times high leverage, they must first agree to the "High Risk Warning". Users can choose the leverage multiple according to the situation.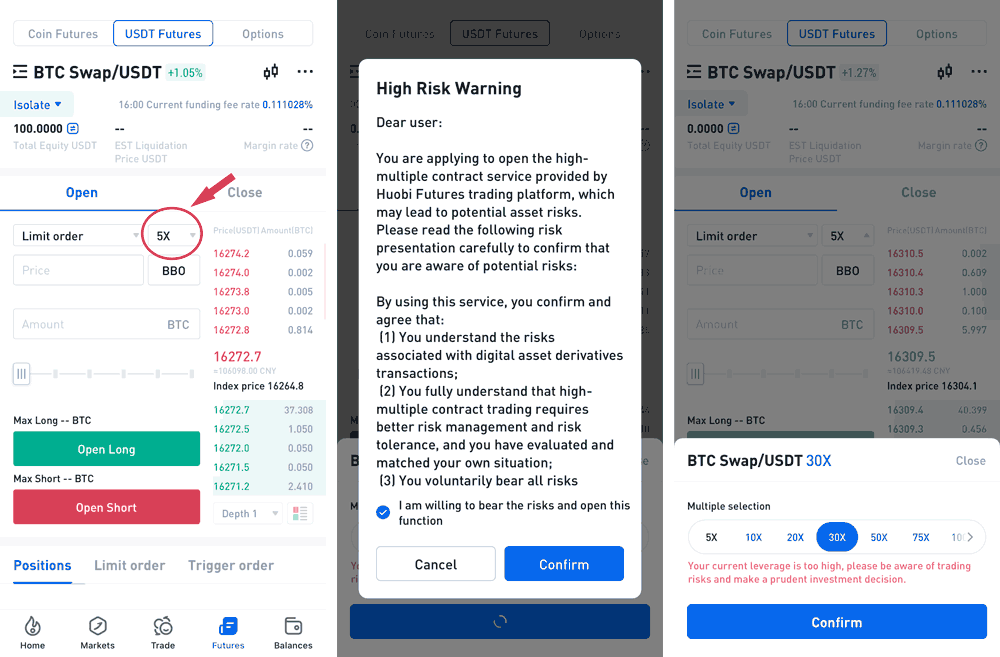
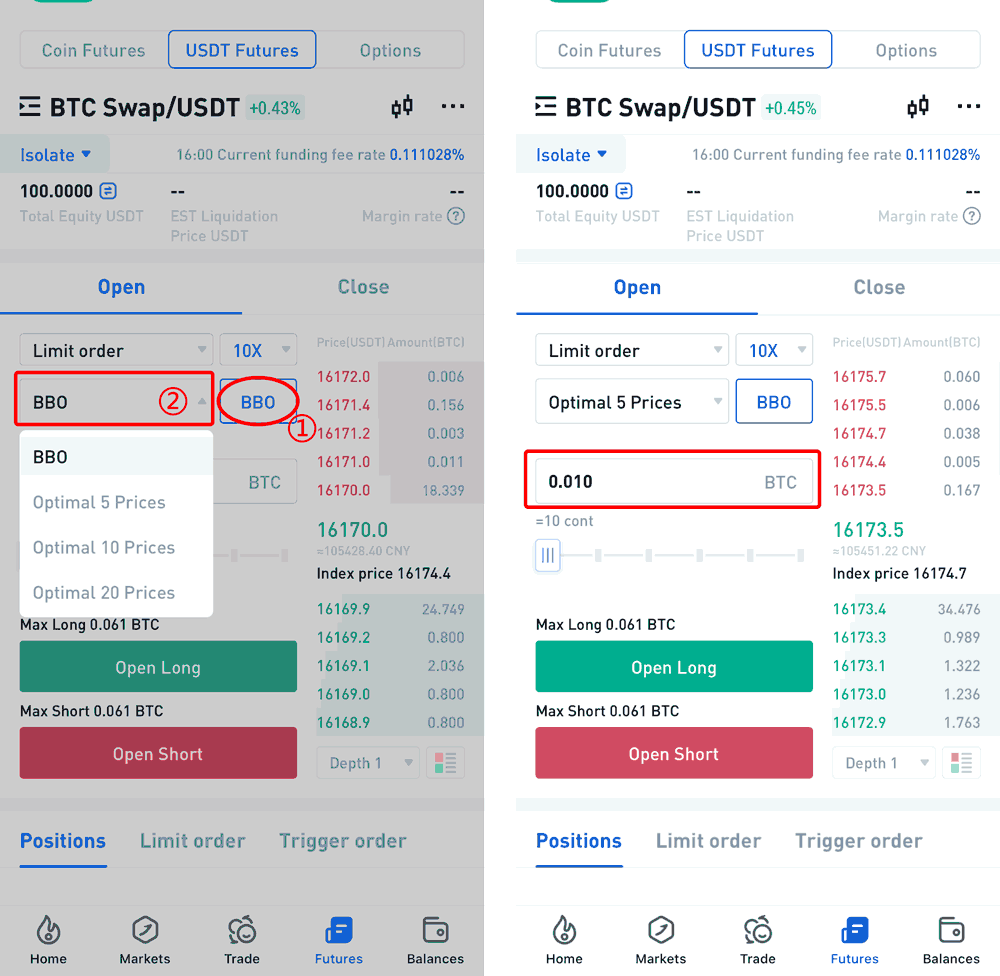
After choosing leverage, users can select limit price order or BBO price order to open positions. If bullish on market, users can open long. If bearish, users can open short.
- Limit order: enter the price and quantity to place an order; or select the "counter price", "optimal 5 files" and other methods, just enter the quantity to place the order. The limit order specifies the highest price the user is willing to buy or the lowest price he is willing to sell. After the user sets the price limit, the market will give priority to the price that reaches the user's favorable direction. Limit orders can be used for opening and closing positions.
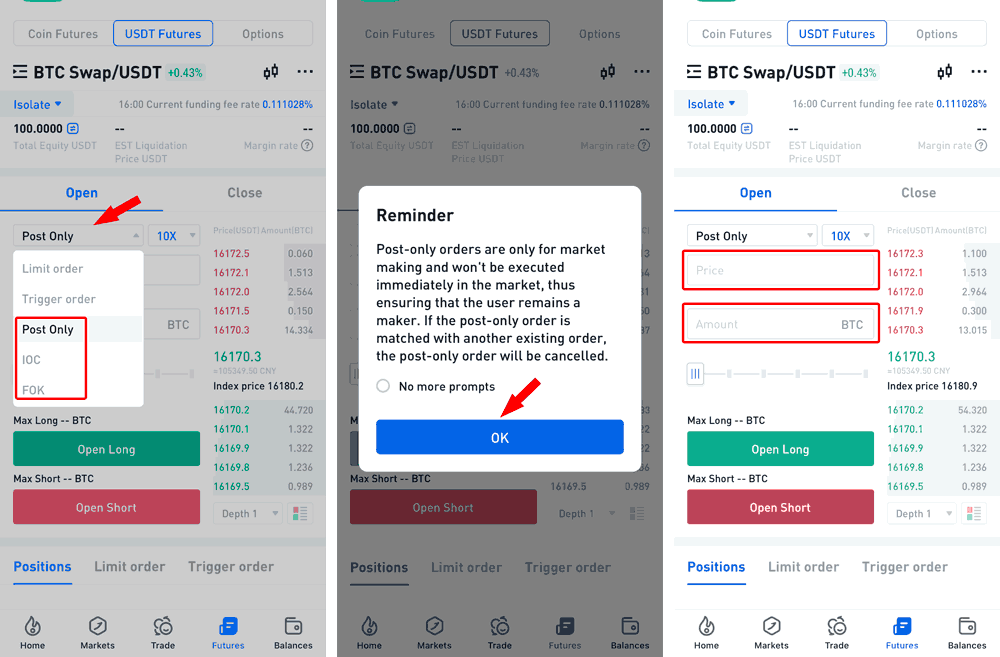
- Limit order can choose three effective mechanisms, "Post only", "Fill Or Kill", "Immediate Or Cancel"; limit order is "always effective" when the mandatory mechanism is not selected.
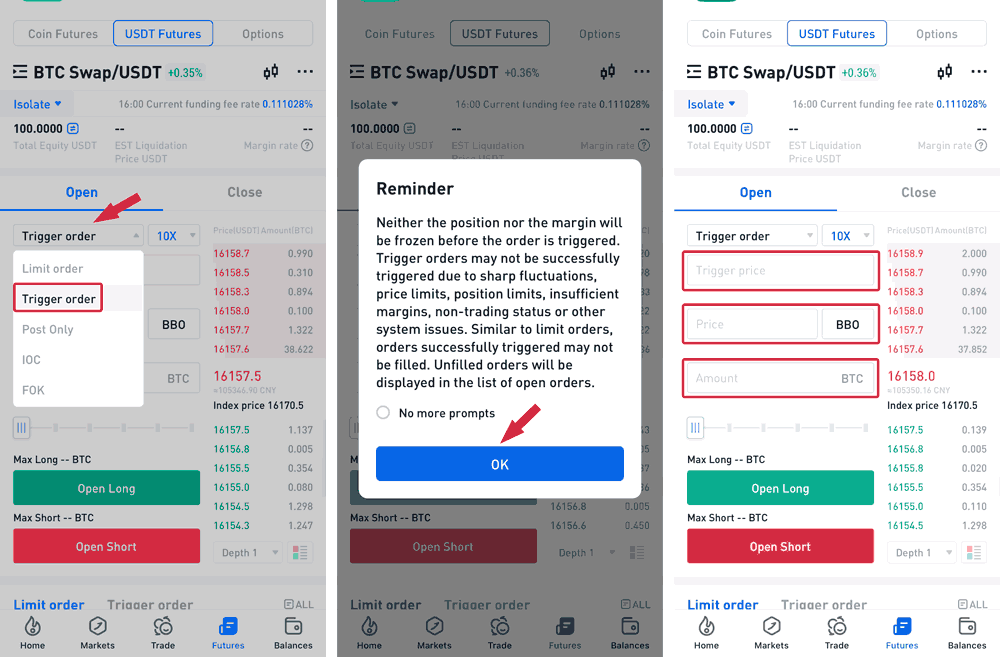
- Trigger order: enter trigger price, order price and amount to place orders.
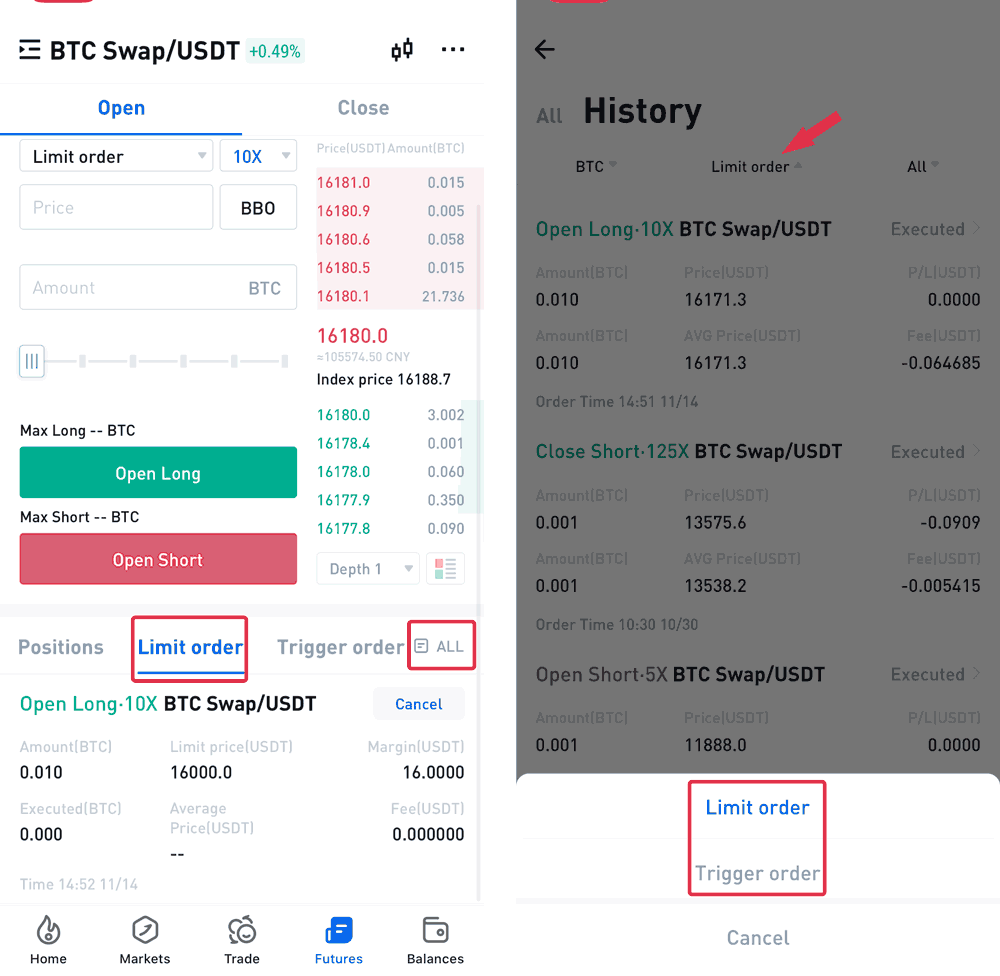
7. Users can find filled orders in Open Positions, and unfilled orders in Open Orders which can be withdrawn before filled. If you want to view the current order, you can pull down the page or click "All". In the pop-up interface, click "History" to view the history of the last three months.
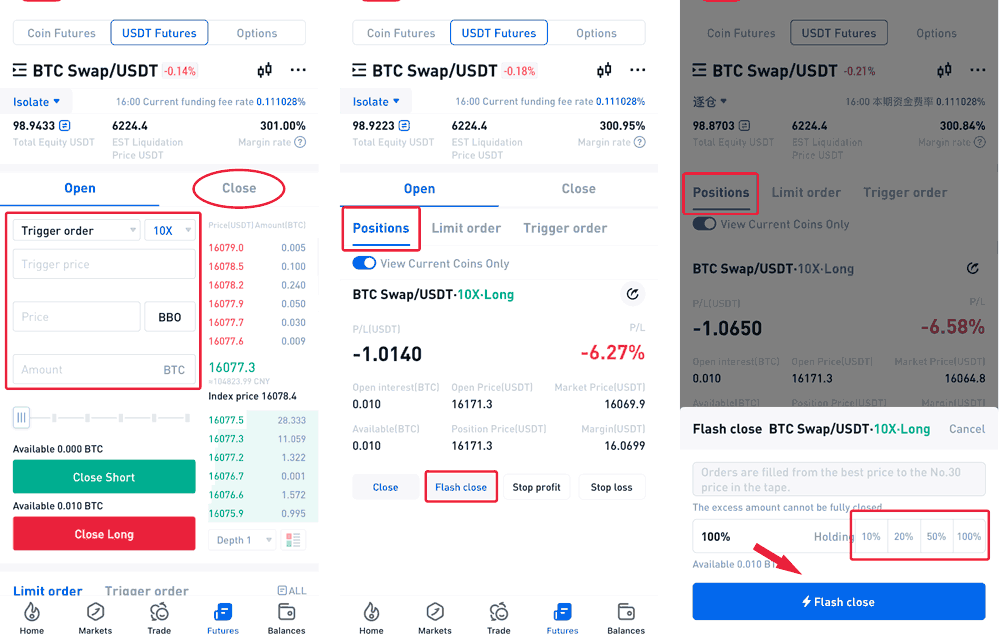
8. When come to close positions, you can also select limit price or BBO price to close long/short positions.
- Switch to the Close interface, select "Limit Order", "Trigger Order" or "Advanced Limit Order" to close the position, and click "Close Long" after confirmation (if you hold the Short Position, please click "Close Short").
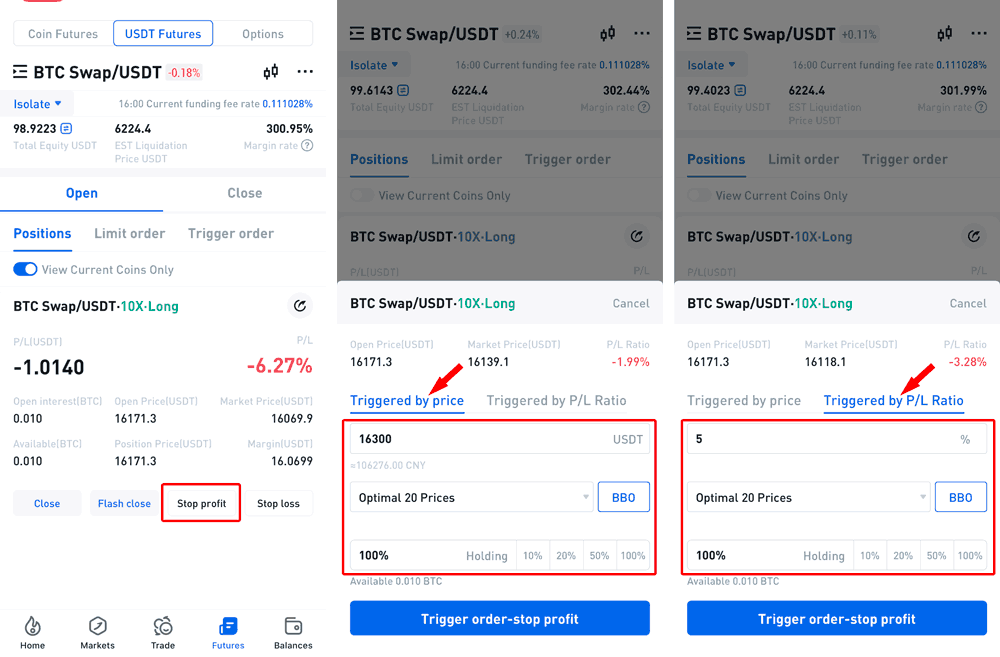
- Switch to the Positions interface and select "Flash Close" or “Stop P/L”.
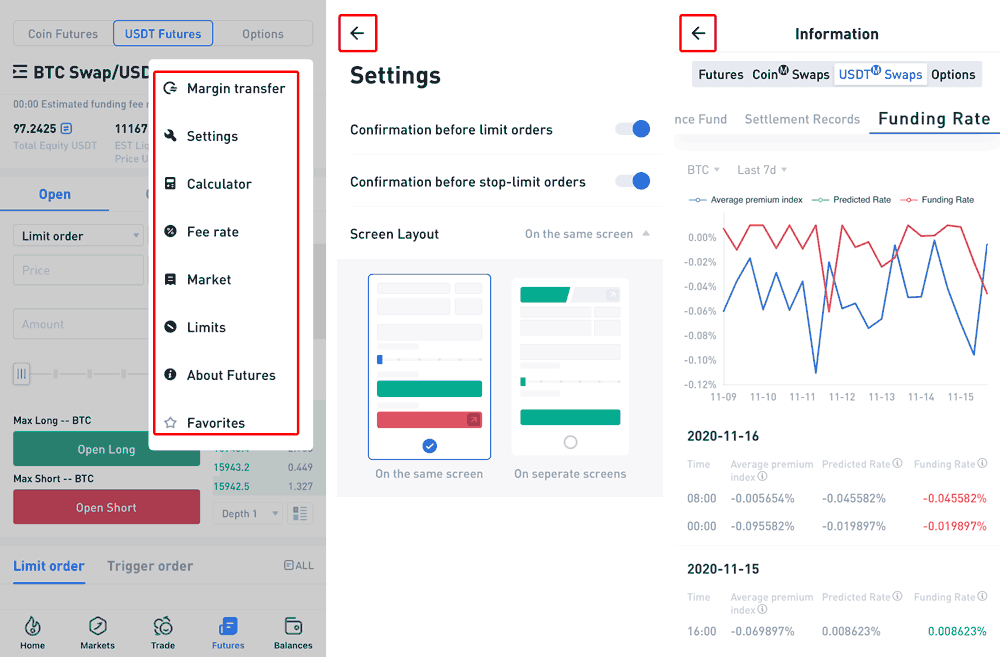
9. Click [···] in the upper right corner of the interface to perform "Settings" and view more "Market".
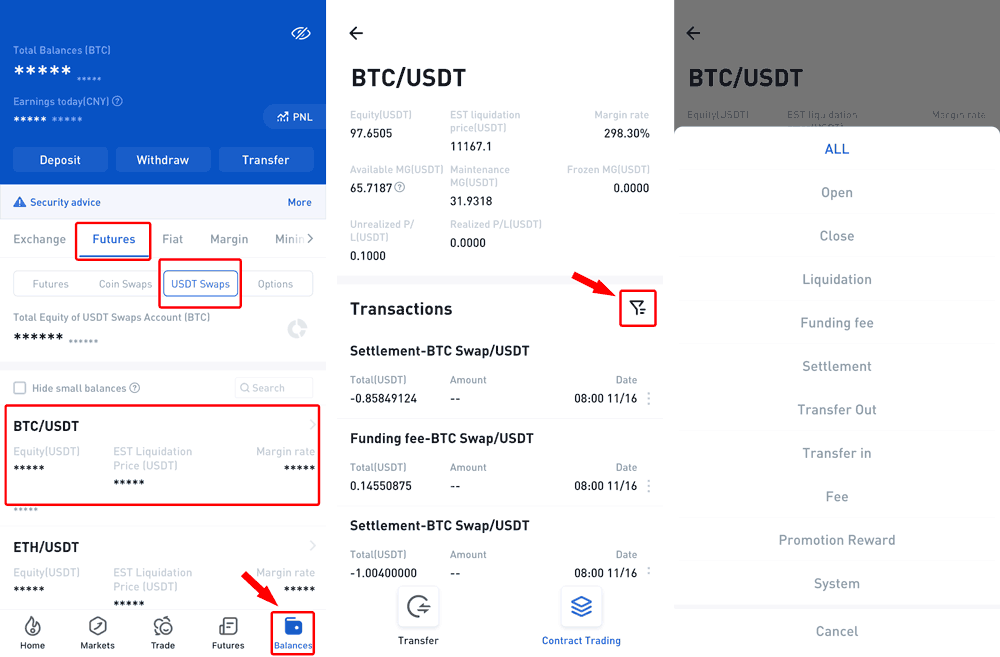
10. Click "Balances" in the lower right corner, select "Futures " and futures type, and you can view the Transactions of the corresponding type.
